Skip to content
HRV Heat Recovery Ventilation System: Complete Guide

HRV Heat Recovery Ventilation System: Complete Guide

An HRV (heat recovery ventilation) system continuously exchanges stale indoor air for fresh outdoor air while reclaiming most of the heat that would otherwise be lost. As supply and exhaust streams pass through a heat-exchange core, warmth from the outgoing air is transferred to the incoming air, so your home gets filtered, tempered fresh air without the energy penalty of simple exhaust fans.

This guide explains how HRV works, where it fits compared with MVHR and ERV, and what to expect in real use: airflow sizing, installation and noise considerations, running costs, and maintenance. You’ll also find checklists for commissioning and filter care, plus decision tips by climate so you can choose the right system and keep it performing at design airflow with predictable energy use.

What an HRV does and how it works

An HRV is a balanced ventilation system that brings in outdoor air and exhausts stale indoor air at the same time. The two airstreams pass through a heat-exchange core so most of the heat from the outgoing air transfers to the incoming stream. You get filtered, tempered fresh air with far less energy loss than simple exhaust. For a plain-language overview of residential ventilation options (HRV vs ERV), see the U.S. Department of Energy’s guide to ventilation. Good ventilation plus filtration is also a key pillar of healthy IAQ per the U.S. EPA.

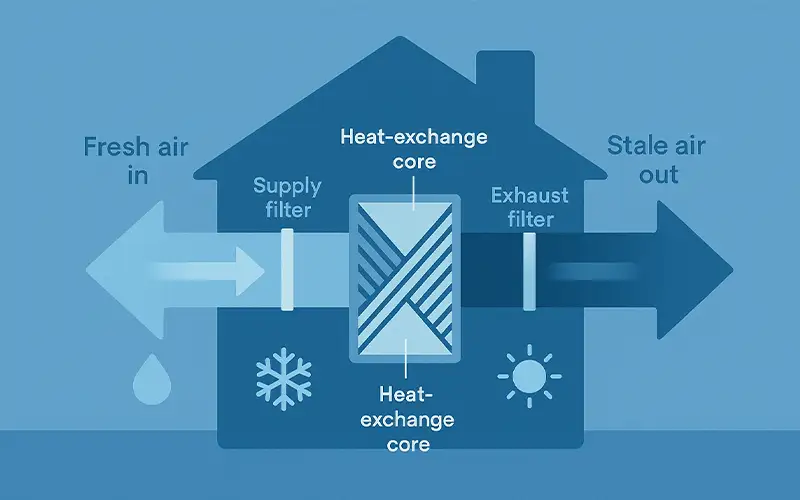
Fresh air in, stale air out, heat exchanged through the core

• Supply fan draws outdoor air through a filter, then across the heat-exchange core, delivering tempered air to bedrooms/living areas.
• Exhaust fan pulls stale air from kitchens/baths/service spaces through a filter and across the opposite side of the core, then out of the home.
• In winter, the core transfers heat from exhaust to supply; many HRVs include defrost or bypass modes to protect the core and maintain flow.
• In summer, most units temper (but don’t cool) incoming air; some models use a bypass to reduce unwanted heat transfer during mild nights.

Where filters sit and what they capture

• Outdoor (supply) side filter: typically a replaceable panel (often MERV 8–11 / ePM10–ePM2.5 class) that captures coarse dust, pollen, and debris before the core and ducts, keeping indoor air cleaner and the heat-exchange surfaces from fouling.
• Exhaust side filter: protects the core and fans from lint, aerosols, and household dust pulled from wet rooms.
• Change filters on the schedule recommended by the manufacturer and monitor pressure drop so airflow stays at the commissioned setpoints.

HRV Heat Recovery Ventilation System Complete Guide

HRV vs MVHR vs ERV

MVHR vs HRV: same idea, different label
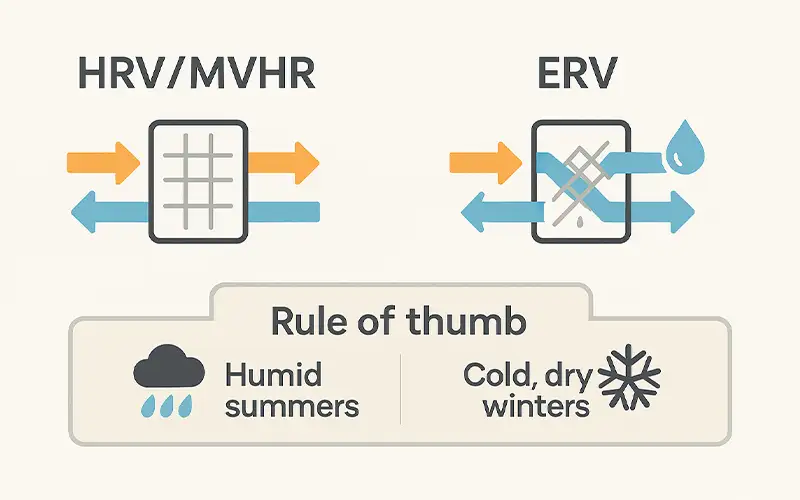
MVHR (mechanical ventilation with heat recovery) is the term commonly used in the UK/EU for what North America calls an HRV (heat recovery ventilation). Both are balanced systems that exchange stale indoor air for outdoor air while transferring sensible heat through a core. For a plain-language overview of residential ventilation, see the U.S. Department of Energy’s guide to ventilation and HRV/ERV systems.

When an ERV is the better choice
An ERV (energy recovery ventilator) also transfers moisture (latent energy) through an enthalpy core. That moisture exchange helps in two common situations:

• Warm, humid summers
An ERV reduces the amount of outdoor moisture entering with the fresh air stream, lowering indoor humidity and easing the load on cooling/dehumidification equipment. The U.S. EPA highlights ventilation plus appropriate filtration and humidity control as pillars of healthy indoor air; see the EPA’s overview of indoor air quality and ventilation.

• Cold, very dry winters
An ERV can help retain some indoor moisture so spaces don’t over-dry during continuous ventilation, improving comfort and reducing static and wood shrinkage.

When an HRV may be preferable
• Cold climates where indoor humidity routinely runs high (cooking/showers) and you want stronger moisture removal to curb condensation on windows and cold surfaces.
• Applications prioritizing maximum sensible heat transfer without moisture carryover (for example, spaces with specific humidity or odor sources exhausting to the outside).

Rule of thumb
Choose ERV for humid climates or when indoor dryness is a comfort issue; choose HRV for cold climates where the main goal is robust moisture removal along with heat recovery. Final selection should consider climate, occupancy, building tightness, and existing heating/cooling equipment, plus the manufacturer’s performance data for sensible and latent effectiveness.
HRV Heat Recovery Ventilation System Complete Guide

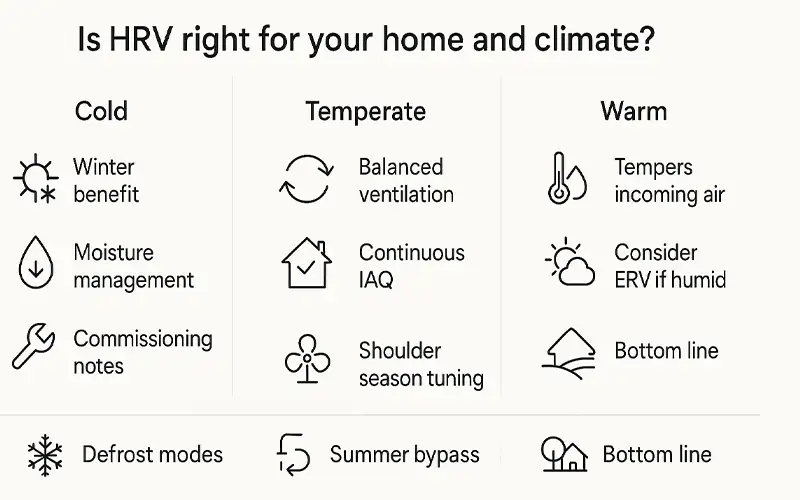
Is HRV right for your home and climate?

HRV works in most regions when it’s sized, installed, and commissioned correctly. The choice is less about “can you use HRV?” and more about whether sensible-only heat recovery (no moisture transfer) fits your humidity profile and seasonal swings.

Cold climates

What to expect
• Clear winter benefit: strong sensible heat recovery keeps supply air temperate while exhausting moist, stale air from kitchens and baths.
• Moisture management: HRV removes indoor humidity more aggressively than ERV, helping prevent window condensation and mold on cold surfaces.
• Commissioning notes: ensure proper defrost strategy, insulated ducts in unconditioned spaces, and airtight penetrations to prevent frost and heat loss.

Best fit
• Tight homes with frequent cooking/showers, where condensation is a concern.
• Electrified or high-efficiency heating systems that benefit from reduced ventilation heat loss.

Temperate climates

What to expect
• Year-round balanced ventilation with mild heating/cooling penalties.
• Shoulder seasons are the sweet spot: HRV runs continuously at low speed for fresh air without large energy penalties.

Best fit
• Homes seeking steady fresh air and odor control without humidity extremes.
• Retrofits where simpler control logic and low maintenance are priorities.

Warm climates

What to expect
• HRV tempers (but does not dehumidify) incoming air. If summers are humid, indoor RH may rise unless the cooling system provides enough latent removal.
• In drier warm regions, HRV performance is similar to temperate zones, with comfort gains from constant fresh air.

Best fit
• Dry or seasonally dry warm regions, or homes with robust dehumidification from HVAC.
• If outdoor humidity is high most of the year, consider ERV instead to limit moisture ingress.

Defrost modes, summer bypass, and shoulder seasons

Defrost modes
• Anti-frost protection is essential in cold weather to keep airflow and effectiveness stable. Common methods include timed recirculation, fan speed reduction, or preheater assistance.
• Choose a unit with a defrost strategy matched to your climate and verify condensate drainage from the core.

Summer bypass
• Many HRVs include a bypass damper that routes air around the core during cool nights to avoid unwanted heat transfer.
• Use bypass during shoulder seasons or overnight free-cooling; disable it during hot afternoons to avoid warming the supply air.

Shoulder season tuning
• Run low, continuous airflow to maintain IAQ with minimal energy use.
• Adjust fan speeds and schedules to align with open-window habits, pollen season, or local outdoor air quality advisories.
• Rebalance if you change filters, fan speeds, or duct configuration—small shifts can reduce effectiveness or raise noise.

Bottom line
Pick HRV for cold-to-temperate climates where moisture removal and sensible heat recovery are priorities. Ensure the unit has appropriate defrost and bypass controls, and commission it with insulated, airtight ducting so you get quiet, steady airflow in every season.

HRV Heat Recovery Ventilation System Complete Guide

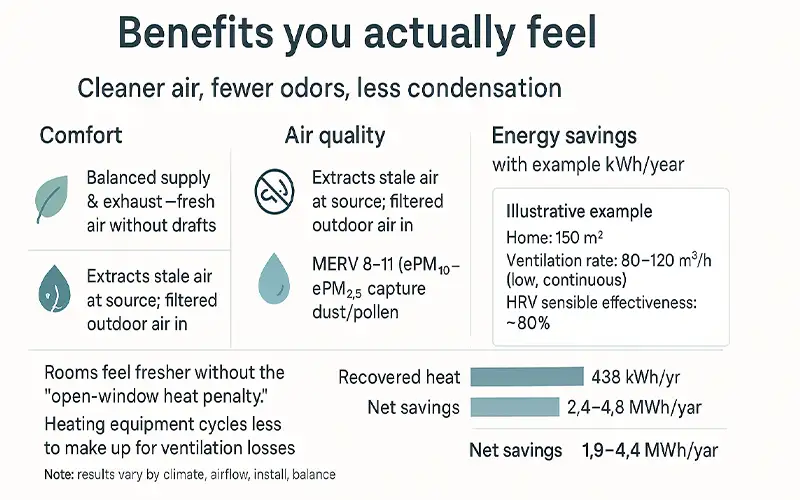
Benefits you actually feel

Cleaner air, fewer odors, less condensation

• Continuous fresh air without cold drafts: supply and exhaust are balanced, so rooms feel fresher without pressure imbalances that pull in dusty air from cracks.
• Less lingering smells: stale air from kitchens, baths, and utility rooms is extracted at the source and replaced with filtered outdoor air.
• Allergy relief potential: supply filters (often MERV 8–11 / ePM10–ePM2.5 class) capture common outdoor dust and pollen before it enters living areas.
• Moisture control: by exhausting humid air and bringing in tempered fresh air, HRV reduces window fogging and moisture on cold surfaces, helping to deter mold in winter.

Energy savings with example kWh/year

The heat-exchange core recovers most of the heat from air you would otherwise throw away with simple exhaust.

Illustrative example
• Home: 150 m², tight envelope in a cold/temperate climate
• Ventilation rate: 90–120 m³/h (low, continuous)
• HRV sensible effectiveness: ~80%
• Fan power at low speed: ~50 W total (supply + exhaust), 24/7

Annual fan energy
0.05 kW × 8,760 h ≈ 438 kWh/year

Avoided ventilation heat loss
Without heat recovery, winter ventilation can cost roughly 3,000–6,000 kWh/year of space-heating energy (range depends on climate, setpoint, and airflow). At 80% recovery, the HRV can return about 2,400–4,800 kWh/year of that heat to the incoming air.

Net effect (order of magnitude)
Recovered heat: ~2,400–4,800 kWh/year
Minus fan energy: ~438 kWh/year
Estimated net savings: ~1,900–4,400 kWh/year

What this means in practice
• Rooms feel fresher without the “open-window heat penalty.”
• Heating equipment cycles less to make up for ventilation losses.
• In mild seasons, you still get steady fresh air at a very low electrical cost.

Note
Actual results vary with climate (heating degree days), airflow setpoint, system effectiveness, and how well the unit is installed and balanced.

HRV Heat Recovery Ventilation System Complete Guide

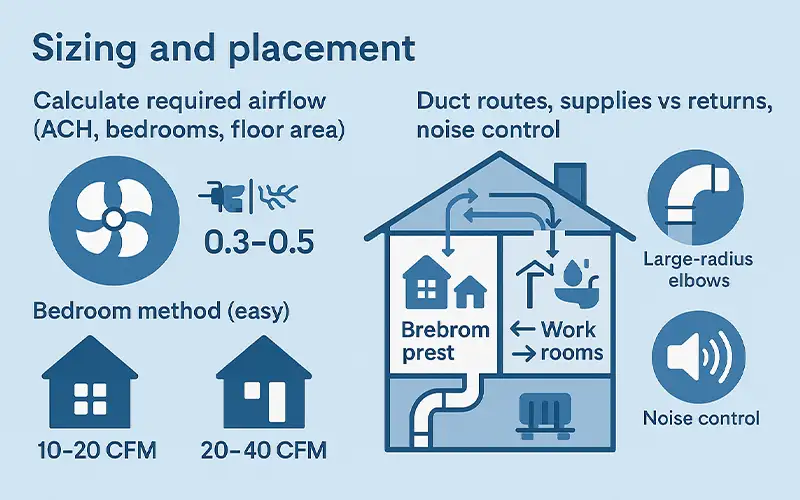
Sizing and placement

Calculate required airflow (ACH, bedrooms, floor area)

Start simple and size for a low, always-on setting that keeps rooms fresh without drafts.

  • Quick target: 0.3–0.5 air changes per hour (ACH) for most homes.

  • Bedroom method (easy): aim 10–20 CFM (17–34 m³/h) to each small bedroom, 20–40 CFM (34–68 m³/h) to the primary bedroom and main living area; exhaust 20–60 CFM (34–102 m³/h) from each bath, laundry, and utility room.

  • Floor-area checkpoint: for a typical tight home, ~0.01–0.02 CFM per ft² (0.6–0.8 m³/h per m²) as a quick reality check.

  • Example: a 1,800 ft², two-bath home often lands near 70–100 CFM continuous on low, with a boost button for showers or parties.

Pro tip: size for steady low speed and use a timed boost for moisture/odor events. Balance supply and exhaust so the home stays near neutral pressure.

Duct routes, supplies vs returns, noise control

Keep air paths short, smooth, and quiet.

  • Supply to “clean” rooms: bedrooms and living areas. Place outlets high on walls/ceilings, away from beds/sofas for gentle mixing.

  • Exhaust from “work” rooms: baths, laundry, utility, and near the kitchen (not the range hood). Undercut doors or add transfer grilles so air moves clean→service spaces.

  • Duct routing: favor rigid or semi-rigid ducts, large-radius elbows, and sealed joints. Insulate any runs in attics/garages to prevent condensation and heat loss.

  • Commissioning: include balancing dampers and test ports; set low and boost flows to spec after filters are installed.

  • Noise control: mount the unit on vibration pads, use short flex connectors at the unit, keep grille velocities modest, and avoid long runs with tight bends near bedrooms. If needed, add a short section of acoustic liner or a small silencer close to quiet rooms.

Bottom line: deliver gentle fresh air to where people spend time, pull exhaust from moisture/odor sources, keep ducts tight and insulated, and commission the system so it’s balanced and quiet on day one.

HRV Heat Recovery Ventilation System Complete Guide

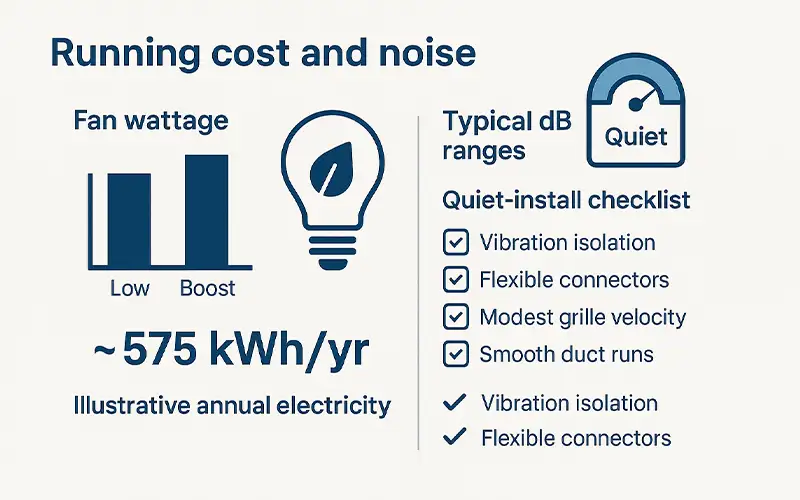
Running cost and noise

Fan wattage at low/high speed, kWh estimate

Most HRVs are designed to run 24/7 at a low, efficient speed and switch to a higher “boost” only for short events.

  • Typical low speed: about 30–80 W total (supply + exhaust fans).

  • Typical boost speed: about 80–200 W, depending on size and duct resistance.

Illustrative annual electricity use

  • Assumptions: 60 W at low, 24/7; plus 60 minutes/day at 140 W boost.

  • Low speed: 0.06 kW × 8,760 h ≈ 526 kWh/year.

  • Boost time: 0.14 kW × 365 h ≈ 51 kWh/year.

  • Estimated total: roughly 575 kWh/year.
    Actual numbers vary with model efficiency, airflow setpoints, duct design, and filter cleanliness. If your unit averages 40 W instead of 60 W, the annual use drops to ~350 kWh.

Ways to keep costs down

  • Size for a steady, low continuous flow; reserve boost for showers, cooking, and gatherings.

  • Use smooth, short duct runs to reduce pressure drop so fans work less.

  • Replace or clean filters on schedule to prevent rising resistance.

Typical dB ranges and how to install quietly

Well-installed HRVs are unobtrusive in living spaces.

  • Unit sound power (manufacturer spec): often mid-30s to low-40s dB(A) at low speed (at the cabinet).

  • At room grilles: with good duct design, perceived sound is typically in the quiet-room range.

Quiet-install checklist

  • Mount the unit on vibration-isolating pads and avoid rigidly coupling it to framing.

  • Use flexible connectors at the unit to decouple motor vibration from ducts.

  • Keep terminal velocities modest (aim ≤250–300 fpm at grilles) to avoid hiss and whistling.

  • Choose short, straight duct runs with large-radius elbows; avoid sudden transitions near bedrooms.

  • Add short sections of lined duct or compact silencers on branches serving quiet rooms.

  • Balance the system after filters are installed; imbalances can increase turbulence and noise.

Bottom line
Select an efficient unit, keep airflow modest and continuous, and install with vibration isolation and smooth ducts. You’ll get fresh air year-round with the electrical load of a small light bulb and sound levels that fade into the background.

HRV Heat Recovery Ventilation System Complete Guide

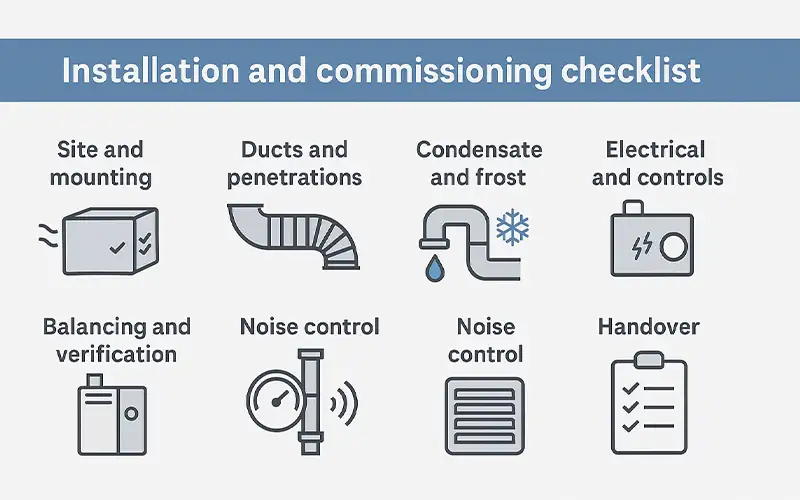
Installation and commissioning checklist

Site and mounting

• Place in a dry, accessible spot away from bedrooms.
• Level cabinet on vibration pads; confirm airflow arrows and service side.

Ducts and penetrations

• Use rigid/semi-rigid ducts; keep runs short with large-radius bends.
• Seal all joints; insulate outdoor air/exhaust in unconditioned spaces.
• Position supplies to bedrooms/living, exhausts to baths/laundry; provide door undercuts.
• Separate exterior hoods and slope to shed water.

Condensate and frost

• Install P-trap and sloped drain; test with water.
• Enable defrost/bypass per climate; protect outdoor ducts from ice/snow.

Electrical and controls

• Dedicated circuit; wire low/boost switches or bath timers.
• Set initial low/boost speeds and schedules.

Balancing and verification

• Install clean filters; record clean ΔP.
• Balance supply ≈ exhaust at low and boost; verify room flows and near-neutral house pressure.

Noise control

• Flex connectors at the unit; keep grille velocities modest.
• Add short lined sections or silencers near quiet rooms if needed.

Handover

• Show filter access and change interval; provide a simple log for ΔP and service dates.

HRV Heat Recovery Ventilation System Complete Guide

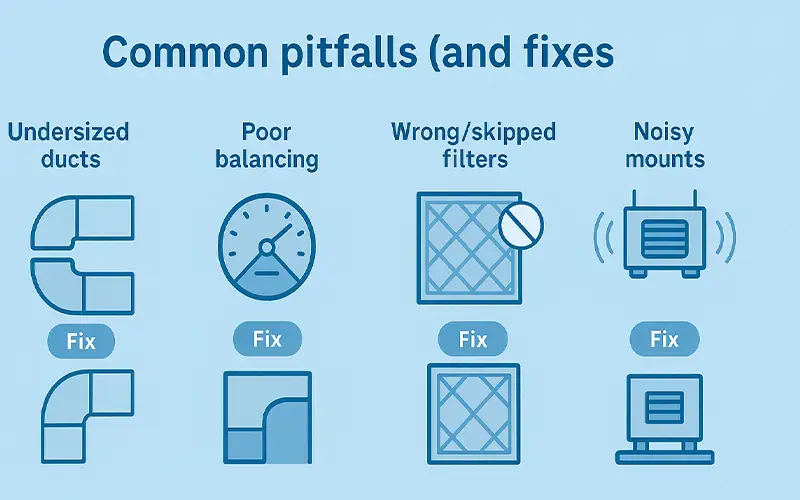
Common pitfalls (and fixes)

Undersized ducts

Problem
Small ducts force high air velocity, raising pressure drop, fan power, and noise. Supply air can feel drafty; boost mode may not reach target flow.

Fix
• Use larger, smoother duct runs with large-radius elbows.
• Keep equivalent length low; avoid long flex.
• Check manufacturer tables for recommended duct sizes at design CFM.

Poor balancing

Problem
Supply and exhaust flows don’t match the design. The home drifts positive or negative, rooms get stuffy, and effectiveness drops.

Fix
• Install balancing dampers on branches and set flows with clean filters in place.
• Verify total supply ≈ total exhaust at low and boost.
• Add test ports near the unit for quick checks after service.

Skipped or wrong filters

Problem
Clogged or missing filters foul the core and fans, reduce airflow, and can reintroduce dust. Using overly tight filters spikes pressure drop.

Fix
• Use appropriate ratings (typically MERV 8–11 or ISO ePM10–ePM2.5).
• Replace every 3–6 months or when ΔP rises unusually fast.
• Label filter sizes/ratings on the cabinet and keep a spare set on site.

Noisy mounts and transmissions

Problem
Rigid mounting and hard-coupled ducts transmit vibration; high grille velocity hisses; tight bends whistle near bedrooms.

Fix
• Mount on vibration pads; use short flex connectors at the unit.
• Keep grille face velocity modest (about ≤250–300 fpm).
• Replace tight elbows with large-radius fittings and smooth transitions.
• Add short lined sections or compact silencers on bedroom branches.

Quick diagnostic cues

• Excess noise at grilles: velocity too high, sharp transitions, or unbalanced branches.
• Low airflow after filter change: check damper positions, blockages, or collapsed flex.
• Room odors persist: confirm exhaust placement and door undercuts; rebalance.
• Frost or water in the cabinet: verify defrost strategy and condensate drain.

HRV Heat Recovery Ventilation System Complete Guide

FAQs

What are the disadvantages of the HRV system?

Upfront cost and space for ducting; routine filter changes and occasional core cleaning; slight electricity use for the fans; potential noise if poorly installed; and, in very cold/dry climates, HRVs can over-dry indoor air unless sized/controlled well (an ERV may be better there).

What is a heat recovery ventilation HRV system?

An HRV is a balanced ventilation system that brings in fresh outdoor air while exhausting stale indoor air. A heat-exchange core transfers warmth from the outgoing air to the incoming air, so you get filtered, tempered fresh air with far less heating loss than simple exhaust.

What should my HRV be set at in winter?

Run low, continuous ventilation and use “boost” in bathrooms and the kitchen during moisture events. Aim for steady airflow that keeps windows clear without drafts; many homes land near 0.3–0.5 ACH (or the manufacturer’s “low” setting). Keep indoor RH roughly 30–40% to limit condensation; enable defrost per the manual.

Do HRV systems really work?

Yes—when sized, installed, and balanced correctly. You’ll notice fresher air, fewer odors, reduced winter condensation, and lower ventilation heat loss versus window venting or simple exhaust fans.

Should you leave HRV on all the time?

Generally yes. HRVs are designed to run 24/7 at a low, efficient speed, then use a timed boost for showers, cooking, or gatherings. Continuous low flow keeps indoor air quality stable and prevents moisture buildup.

What is the $5000 rule for HVAC?

A rule of thumb for repair vs. replace: multiply the system’s age by the repair cost; if the product exceeds about $5,000, replacement may make more economic sense. It’s only a guideline—also consider efficiency, comfort issues, and upcoming maintenance.

Do I need to open windows if I have HRV?

No. An HRV provides continuous fresh air without opening windows. You can still open windows for comfort when outdoor conditions are good, but keep them closed during extreme weather, pollen, smoke, or high humidity.

Can HRV detect stress?

No. That’s a mix-up with “heart rate variability (HRV),” a health metric. A heat recovery ventilator (HRV) is a ventilation appliance; it does not measure human stress.

Does HRV use a lot of power?

Not typically. Many units draw about 30–80 W total at low speed and 80–200 W in boost. Annual electricity use is often in the few-hundred-kWh range, and recovered heat in cold seasons offsets much of the ventilation energy penalty.

Next steps

Get a sizing recommendation

Share your floor area, number of bedrooms, climate (city), and any humidity/condensation issues. We’ll suggest HRV vs ERV, a target continuous airflow (ACH/CFM), and placement tips for quiet operation.

Request a quote and filter plan

Tell us your preferred install window and budget range. We’ll return model options, estimated running cost, and a simple filter plan (ratings and change intervals) with lead times and installation checklist.

Final thoughts

Treat panel filters as strategic components, not commodities. When they’re sized correctly, sealed tightly, and specified for coarse capture at low, stable pressure drop, they keep coils clean, fans efficient, and premium stages focused on fine PM—cutting rework, energy, and waste. The winning recipe is simple: match the filter to your dust profile, verify performance at your actual face velocity, set realistic ΔP changeout points, and maintain a clean seal every time.

If you’re unsure where to start, gather four numbers—frame size, target rating (MERV or ISO ePM), clean ΔP at your operating velocity, and desired final ΔP—and compare pleated options against your current flat panels. In most multi-stage systems, a quality pleated MERV 8–11 (ePM10) prefilter delivers the best total cost of ownership while protecting downstream bag and HEPA filters.

Previous article 9 Symptoms Your Ceiling Diffusion Media Is Overdue (and what to check first)
Next article How to size paint arrestor rolls

Leave a comment

* Required fields